Guitar Tips and Tricks:Technique Pt. 1 – Legato
By: Josh Lucas
I love legato!
But more importantly, developing your left hand is fundamental for many techniques. I’d like to start showing you ways to strengthen your left hand, and also make it more efficient so that you can play some cool legato lines–even on an acoustic guitar.
Not only that, but a strong and mobile left hand is essential even if you prefer alternate picking–or even if you could care less, and just want to play.
I feel like it’s necessary to preface this a bit, and talk about your left hand’s technique, and what you need to do to be comfortable using all of your fingers effectively. You’ll need to make sure you’re not using the dreaded baseball bat grip I’ve mentioned before. Your guitar’s neck should be tilted slightly upward. Your thumb should be about midway down the guitar’s neck, and it should usually be across from your middle and index fingers. This changes a bit as we get beyond the 12th fret, and your arm extends inward, nearer to your body. There should be some space between your hand and the guitar’s neck. You want to avoid any unnecessary turning of the wrist, or deviation from this base position. Doing so will cause tension, and at best will fatigue you much more quickly. Of course there are exceptions. For example, for the purposes of these exercises, as you perform wider stretches with your left hand, you must lower your thumb more to the middle-lower part of the guitar’s neck.
Look at this blog for some picture examples.
Hammer-ons From Nowhere, and pull-offs
When we are using legato techniques, we ascend the scale by performing hammer-ons, and we descend the scale by performing pull-offs.
Let’s begin by pressing your index finger onto the “A” note at the 5th fret of the high e string, just as though you were holding it down, waiting to strike the note. Now let’s use the same finger on the same fret, but rather than just pressing it down, get some velocity behind your finger and actually strike the note with your left hand’s index finger, and leave your finger on the fretboard–because that’s how you get a note to sustain, right?
This is extremely awkward at first. In fact, when I first tried, it wasn’t possible. But keep trying. We aren’t worried about speed, all we’re worried about is getting a loud note by striking the fifth fret with your left hand, and having that note sustain. Repeat with your other fingers, middle finger on the 6th fret, ring finger on the 7th, pinkie on the 8th.
Now practice pull-offs. Start with one finger hovering over each fret again, index over the 5th, middle over the 6th, and so forth–but this time let’s practice just the motion of a pull-off.
A pull-off isn’t letting your finger off of the fretboard. You have to flick the string with your left hand fingers. So that’s what we’re going to do!
With your index over the fifth fret, pluck the string with the index finger of your left hand. Over the sixth, use your middle–that way you’re still working on stretching your hand out.
Trills
Here’s a great exercise that I learned in high school, and developed to include hammer-ons from nowhere.
This will stretch your hand out, and get you used to some of the bigger stretches that you’ll need to pull off some blazing legato lines.
If you already know what a trill is, you can ignore the next paragraph and skip to the exercise.
Hold your index finger down on the 5th fret. Keep it planted, and repeatedly hammer on, and pull off from your middle finger on the 6th fret to your (still planted) index finger on the 5th fret. See how loud you can make each note, then see how fast you can go! Now, stretch your middle finger up one more fret, and trill between your middle finger on the 7th fret to your index finger on the 5th fret.
Repeat this exercise between your ring finger at the 7th and your index still on the 5th, then stretch your ring finger up to the 8th fret.
Finally, let’s take your pinkie and trill from the 8th down to your index on the 5th fret, and stretch your pinkie out to the 9th fret for that big trill.
Were you able to stretch out that far? If not, see how far you can take it.
So which finger did we leave out? That’s right. The index finger hasn’t got any trilling in, because there’s no finger below it. So let’s trill from the fifth fret, to open.
The Right Hand
Although your right hand is taking a supporting role here, I should mention to be mindful about string crossings–after all, in real life we won’t just be going up and down the scale. The following scalar examples will detail the right-hand techniques (downstrokes, and upstrokes) the way that I use them. There are certainly other ways to execute these runs, but for the purpose of these exercises I recommend using the right hand as I have detailed.
The most important thing is to be mindful of volume. You don’t need to pick hard at all, because you want your picked notes to be the same volume as the notes you’re executing through hammer-ons and pull-offs.
Examples
I want to note that most of these examples are rather rigid and left-brained, for lack of a better term. That’s because I’m always training to perform, and when I perform and write, I like to let loose and do as little thinking as possible. I would never play these examples verbatim in my guitar solos.
The reason that I train in this way is because it teaches us to have specific logical solutions to technical problems that we come across with various techniques, such as string crossing.
I’m going to give several examples, each one ramping up in difficulty. We’ll work up to wide stretches, and three note per string scales.
Once you get an exercise down, it can be looped over and over with a metronome–I’d recommend using 1/4 time on your Metronome for the last two examples, if you’ve got a metronome that accents the first beat of each measure. Next newsletter, I’ll give you examples with triplets, sextuplets, and who knows maybe we’ll even get weird with subdividing!
I hope this gives you all something useful and challenging to practice. Let’s get it!
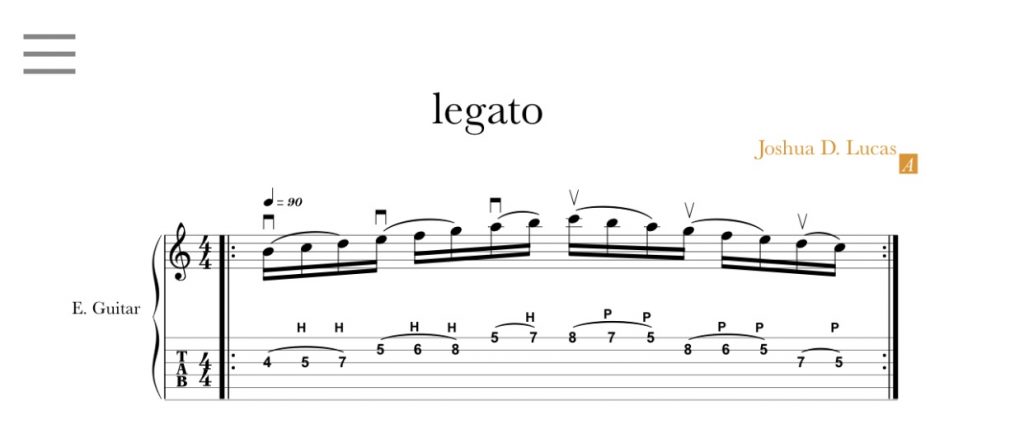
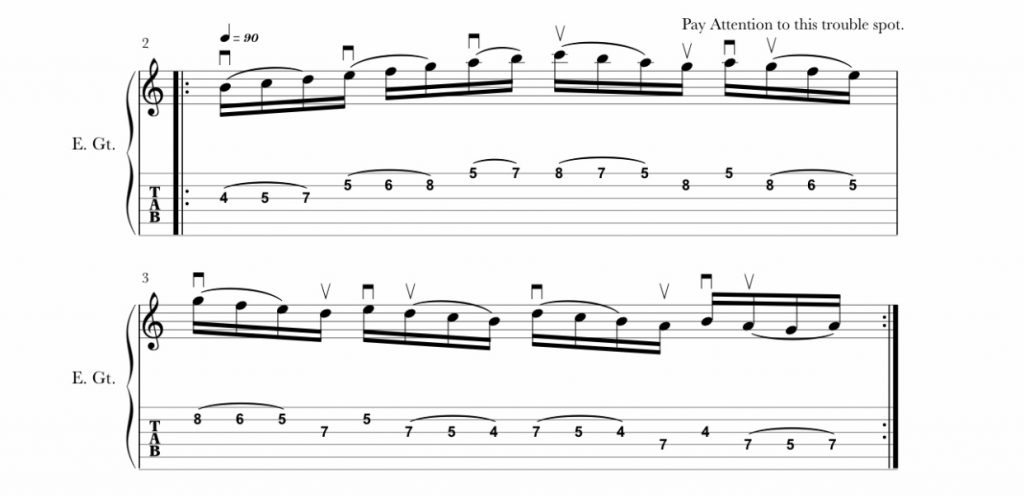
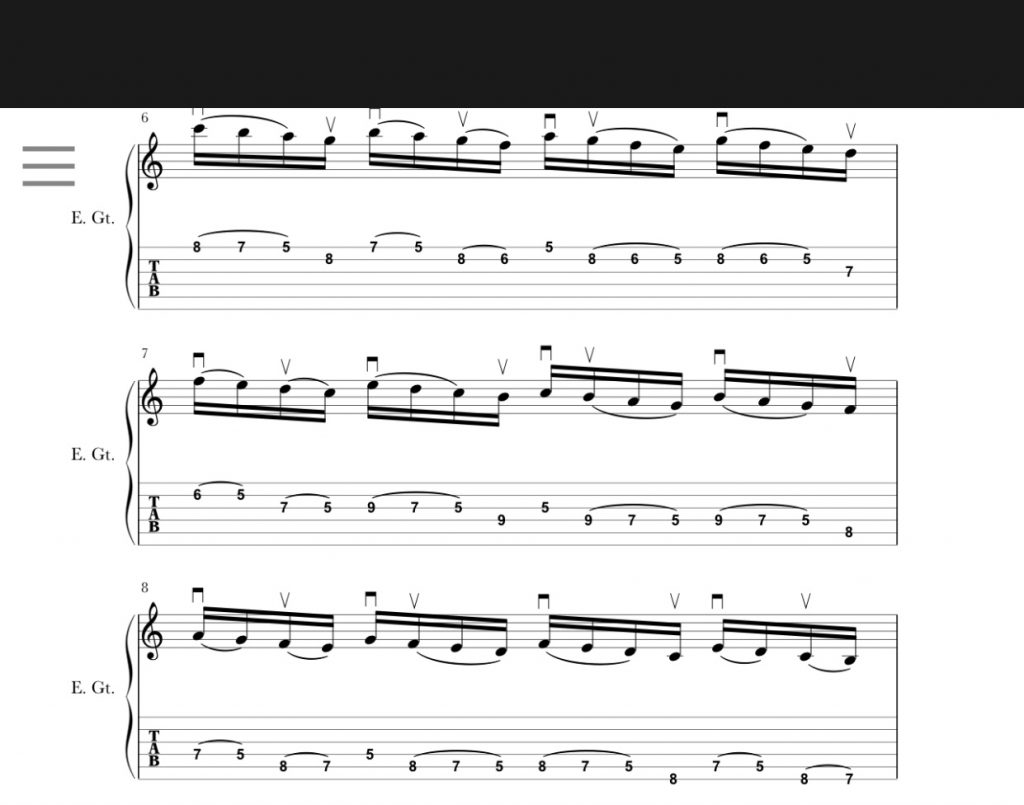
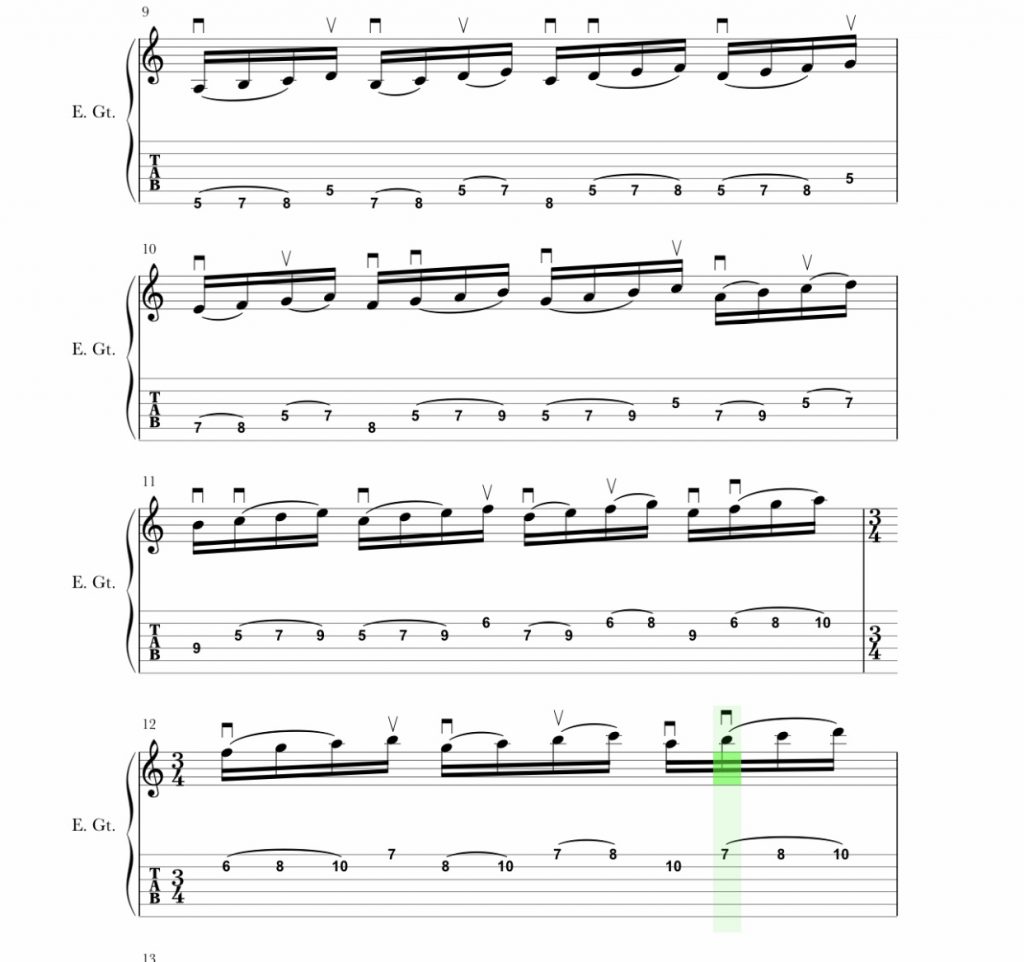
Once you master the last two examples, you can actually link them together into one long, challenging exercise!
Is it weird to read about techniques, and you’d prefer a video? Remember, if you have bought a guitar recently you’ve got free guitar lessons! Take advantage of them to get video examples of this, and many other videos through our website.
Thanks everyone, and I hope you all practice harder than me this week! Take a video, and tag us on instagram if you can make it through these exercises. Let’s go!


